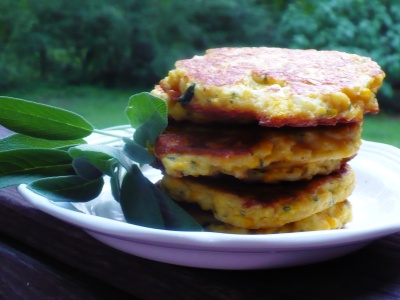
What do you get when you need to figure out how to use the sage in your garden, you want to try a new recipe, supper needs to be on the table pronto, and you’ve been thinking about writing a post for Weekend Herb Blogging? Well, I have no idea what you would get, but I got Savory Sage Corn Cakes.
Here’s the thought process…”Quesdillas with zuchinni and squash…what would go with that?? refried beans……I need something else too…..[grabs The Essential Vegetarian Cookbook by Diana White from the pile and begins flipping]…..Radicchio with Potatoes & Celery…what is radicchio?……Chilled Spinach and Herb Soup…promising, but not with quesadillas….Savory Baked Corn Cakes….looks a little bland….sage goes well with cornbread, maybe that would work…..wait….sage…that would work for Weekend Herb Blogging….score!
I did not realize at the time what a score this recipe was. It was an easy gluten free conversion, came together quickly, was absolutely delicious, and reheated well for lunch the next day.
First, the gluten free conversion. The recipe, as originally written, called for 2 Tbsp. of all-purpose flour. I was not confident that 2 Tbsp. of brown rice flour would hold the batter together, so I added 2 Tbsp. of corn starch for extra binding power and xanthum gum to ward off crumbling (whisper:/John, I think I’ve been playing WoW too much). It worked like a charm; the cakes were as easy to flip as hamburgers.
Second, easy to come together. I didn’t realize this until I was writing the recipe, but the prep for this recipe has only one step. You put everything into the food processor and blend it. Such simplicity is very rare in my cooking, maybe in all gluten free cooking, and should be duly celebrated!
Third, was absolutely delicious. Here are a few excerpts from our dinner conversation Mary:”This is just warm, yummy goodness.” a few minutes later, John: “This is really good!” Mary:”I like the sour cream on top.” John: “You like sour cream on top of anything” Mary:”That’s true” John:”I like the salsa on it too” John:”Do I really have to save some for tomorrow?” Mary:”Yes”
Fourth, reheated well for lunch the next day. Not only was it just as yummy the next day, it also survived the commute in a plastic baggie without any breakage. I was pleasantly surprised by this since gluten free foods do tend to dry out quickly and then crumble to bits.

For you Weekend Herb Bloggers (hosted this week by the Cooking Diva, here are five things that you should know about sage:
- The dried herb is an essential ingredient in Cornbread Stuffing.
- The plant survives drought conditions marvelously.
- Sage is often used to flavor fatty meats, cheeses, and as mentioned above, stuffings. (from Wikipedia)
- One should not harvest from your sage plant during the first year. Oops! (from about.com)
- The latin name for sage, salvia, means “to heal”. Salvia is often used as a treatment for indigestion. (from Wikipedia)
Instructions
- 3 c. corn kernels *
- 1/4 c. onion, diced
- 2 large eggs, beaten
- 2 Tbsp. brown rice flour
- 2 Tbsp. corn starch
- 1 tsp. xanthan gum
- 1 tsp. salt
- 6 sage leaves, minced
- canola oil as needed for skillet
- sour cream (optional)
- cilantro (optional)
- caramelized onions (optional)
- Combine all ingredients in a food processor. Pulse a few times until the corn is finely minced.
- Heat one tablespoon oil over medium-low heat in a cast iron skillet or non-stick skillet. When the skillet is hot, use a 1/8 cup measure to pour the batter onto the skillet as if you were making pancakes.
- After the cakes have cooked for a few minutes, take a peek to see if the cakes are browning on the bottom. If the bottom is golden, then the cakes are ready to flip. Otherwise keep cooking them on that side until they are golden brown.
- Once you’ve flipped the cakes, continue cooking them until the second side is golden brown as well. Before you remove the cakes from the skillet, cut one in half to make sure they have cooked though. If not, turn the heat down, and continue cooking for a one to two minutes more.
- Top with sour cream, or cilantro, or salsa, or caramelized onions or whatever you think will go well with main entree.
* If you’re using fresh corn, remove the husks and silks, and then blanch the corn on the cob in boiling water for 5 minutes. Remove the corn to an ice water bath for 5 minutes, and then dry the corn and cut the kernels from the cob with a sharp knife. Here’s a tutorial on freezing fresh corn that includes pictures of what I’ve just described. You’ll stop after Step 6 and use the cut kernels in this recipe.
If you don’t have fresh corn, then you can also use frozen corn niblets.

Those corn cakes look delicious! Thank you for joining the WHB#95!
Melissa
How beautiful! Great entry!
Melissa,
Thanks for stopping by! I’m looking forward to seeing the roundup.
Natalie,
Thanks! I hope you’ll have a chance to try them. They are quite fast to cook, and perfect for little fingers.
This looks absolutely delicious. I will have to try it someday soon- I even have the fresh sage growing on my balcony. I made a savory corn cake thing that was a little similar, but it had the whole corn kernels. Can’t wait to try your version.
-Sea
of the Gluten Free http://www.bookofyum.com
I’m happy to see that Melissa is doing better and has finally posted the recap for this WHB. Thanks for being so patient.